
Clubhouse Decking Installation Guide
QUICK TIPS
- Ensure you read the installation guide prior to starting
- Follow proper fastening methods as per installation guide
- Do not over torque screws
- Leave sufficient overhang on boards for expansion and contraction
- To finish off your deck use Fascia boards
- Deck structure must comply with Local Building Official Code
TOOLS REQUIRED
- Pencil
- Level
- Jigsaw
- Handsaw
- Chop Saw/Table Saw (optional)
- Drill
- Chalk Line
- Square
- Tape Measure
Installation Instructions – General Information
Clubhouse Decking features KoreliteTM technology with performance in mind. Clubhouse Decking should be installed using the same building requirements used for wood or composite decking and should adhere to local building codes. Clubhouse Decking products meet and exceed the acceptable criteria for the Universal Building Code’s CCRR Tested in Compliance with ICC-ES AC174 requirements. ASTM D 7032-08 and ICC-ES AC10. CCRR-0175 (Clubhouse Decking).
WARNING: Parts have sharp points and edges. Use extreme caution when handling and installing. Wear safety glasses and PPE at all times.
Storage and Handling
- Although all Clubhouse PVC Decking planks are made with low-maintenance materials, each plank should be handled with care to ensure lasting beauty.
- Keep product covered. Use shrouds on job site to protect from sun.
- Store under cover to maintain a clean surface.
- Store flat and on a dry surface.
- Stack units with banding and bottom supports aligned.
- Do not store more than 12 bundles high.
- Never dump Clubhouse Decking planks when unloading.
- Always carry the plank on its edge for better support.
- Do not slide planks against each other or drag equipment, including tools, across the top of the planks.
- When loading/unloading, do not pick up more than 3 lifts (12’ and 16’) or 2 lifts (20’) at one time.
- During construction, keep the surface of planks clear of waste and debris.
- During storage, product temperature should not exceed 49°C or 120°F.
Recommended Tools for Installation
- Clubhouse PVC deck planks require no special tools for installation. The following is a list of standard tools required:
- Variable speed drill
- 3/16” drill bit
- Plate joiner (for use with hidden fastener system)
- Circular saw with carbide-tipped blade (minimum 60 teeth)
- Jigsaw – a finer tooth blade will leave a cleaner cut. The blade should have 10 or more teeth per inch with a reverse setting on the teeth.
- Tape measure
- Framing square
- Pencil
- Safety glasses
- Rubber mallet
- Chalk line (clean off chalk with water)
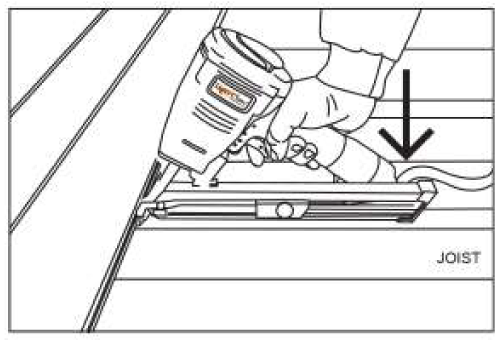
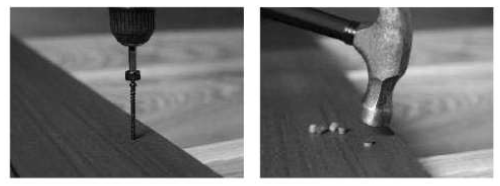
Because of the density of Clubhouse PVC, nails and nail guns are not recommended.
Ventilation is required.
There must be unobstructed continuous airspace beneath the deck to allow for proper ventilation. A minimum of 6” of free air space is required under the deck planks, or one sq. ft. of ventilation for every 300 cubic feet of air space. This will allow for proper air flow and will reduce moisture buildup produced by condensation and reduce heat buildup on sunny days.
- The use of lattice panels are permitted as long as the lattice openings are, at minimum, as wide as the lattice slats.
- Clubhouse PVC deck planks should never be used for roof applications, directly on top of/attached to a cement slab or existing deck, or installed directly in contact with the ground.
- Use caution when installing decking where reflection from Low-E glass and windows could cause extreme heat buildup.
- Use surface vents when using under deck and/or when ventilation of the deck is not available. A 2” x 48” fiberglass strip vent can be let into the decking boards for a flush look (these are removable for periodic cleaning).
- Side vents in joists can also be installed to help improve airflow.
- Add sleepers in potential affected areas at 8” on centre.
- Use shade from trees/an awning to help reduce heat buildup
Failure to provide adequate ventilation may result in damage to the product and will void the warranty.
Joist Spacing for New and Existing Frames
For both new and existing deck frames, use the following guidelines for joist spacing prior to installing Clubhouse PVC Decking.
IMPORTANT: Clubhouse PVC Decking is a load bearing material but should NEVER be used for structural framing. Consult your local building codes for specific information.
- For proper installation, joist system must be level
- Residential installations: 5/4” plank up to 16” on centre. For diagonal installations, reduce span by 4”. For optimum feel, use 12” spacing.
- Commercial installations: Review local building codes for framing requirements.
- Stairs: 5/4” plank up to 10” on centre.
- To aid in water run-off and reduced pooling, the deck should slope 1/2” for every 8’ away from structure.
Traditional Screw Down Installation
We recommend surface screws designed for dense PVC Decking. Always refer to the fastener manufacturer’s recommendations and warranties to determine the best one for the job.
Always choose fasteners that have an ACQ rated finish and one that is guaranteed by the fastener manufacturer. Fasteners must also comply with ASTM A153 or current code. For best results, use Clubhouse Hidden Fastening Systems and Cortex plugs.
Note: Be sure to test screws on a scrap piece of Clubhouse PVC Decking prior to installation.
The use of nails and nail guns is not recommended with Clubhouse PVC Decking.
Clubhouse Screw Colour Charts


Recommended fastening systems for Clubhouse Decking are Clubhouse ConnectClips, Clubhouse Cortex® Hidden Fastening System, and Clubhouse EB-TY Hidden Biscuit Fasteners.
Other approved fastening systems include:
HF Biscuit, HIDfast, Tiger Claw TC-G, CAMO, The Deck Clip, DeckMaster, UnderDeck.
Here are some best practices:
- Pre-drilling is recommended for the best overall appearance with most fasteners
- Always start the screw at a slower speed and maintain a steady speed and pressure. This allows the screw to cut into the plank, rather than merely burn or spin.
- Mushrooming is a term that refers to the “bubble” of material that forms around the screw head as the threads exhaust PVC plank material toward the surface, resulting in a mushroom-like appearance.
- To avoid mushrooming, pre-drilling is recommended. Keep drill at a constant, steady speed until the fastener is completely flush or countersunk approximately 1/16”.
- Temperature, humidity, and the moisture of the substructure can affect how much a PVC plank mushrooms.
Guidelines for Bending Clubhouse Decking Planks
Using dry heat source, heat planks slowly to 170°F (77°C) for 1/2 hour.
- Build guide system to lay plank in. Place plank into guide system slowly. “Do not apply stress”.
- Once the plank is in the guide system, allow it to cool (the temperature of the plank should be below 90°F/32°C) before applying screws.
- The recommended minimum radius for 16’ planks is 8’.
Colour Patterns and Variation of Variegated Clubhouse Hardwood Decking
Clubhouse Hardwood Decking is designed with variegation and variation in colour and patterns. For best results during installation, it is recommended that multiple courses of planks be laid out prior to installation. The courses should be reviewed for desired effect. This process is most critical when installing boards from multiple bundles of material. Mixing colours and patterns will allow for the most realistic replication of true hardwood decking.
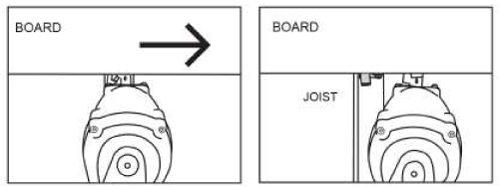
Clubhouse deck planks should be installed in the same direction. To do this, identify the side with the date code and identification information on the side of the plank.
Install the planks consistently with this marking on the same side. This will allow for a more consistent appearance.
Screw Down Installation Process
Begin installing planks at the outside edge of the deck and work back toward the structure. Screws should not be placed closer than 3/4” from end of edge of plank.
- Notch first plank to fit around any wood posts as necessary.
- Install the first plank with colour-coordinated screws using two screws per plank, per joist.
- To minimize the strain on screws and the deck board, use PL Premium Max on perimeter rim joists, particularly for boards running parallel on top of, and fastened to the rim joists.
- Continue installing planks across the joists, allowing a 1/8” gap between planks. Gapping allows for expansion of planks for proper water drainage. (See figure 2). Planks should be fastened at every joist, 16” on centre.
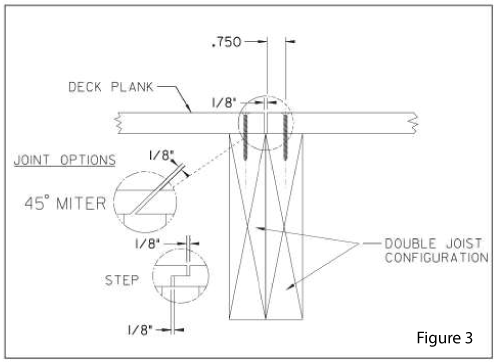
- When butting planks end to end, planks should only butt together over a joist or other proper support. Use a double joist at butt ends. For the best appearance options, miter ends at 45 degrees or step overlap ends of the butt joint. (See Figure 3)
- Always consult your local building code for application procedures.
- Do not allow Clubhouse PVC planks to overhang more than 1-1/4” on all exposed sides of the deck.
Expansion and Contraction
All synthetic decking material will expand and contract as temperatures change. We recommend the following to help manage and minimize expansion and contraction:

Try to cut and install boards during the average temperature range expected over the life of the deck. Installing during high heat or low temperatures requires very careful planning and may lead to undesired end to end spacing
- Use shrouds and keep deck boards covered during storage and at job site.
- Remember temperature of boards may be higher than ambient temperature, especially on hardwoods and boards left in direct sunlight.
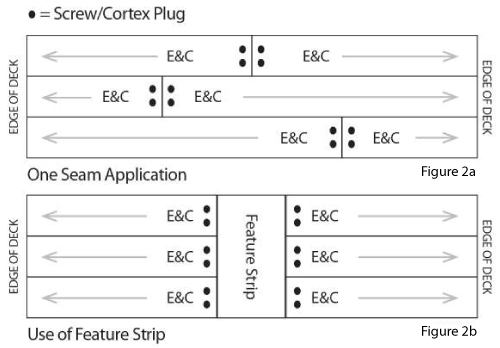
- Use feature strips to create design features and reduce seams (see Figure 2b).
- Fasten with 2 screws/Cortex plugs 3/4” from end of each plank and allow expansion and contraction to move to the perimeter of the deck (see Figure 2a).
Fascia Installation
Due to the width of the fascia board, it is not uncommon that both sides will vary from each other in colour. Please choose a side that you feel represents the look of the deck and surrounding fascia boards.
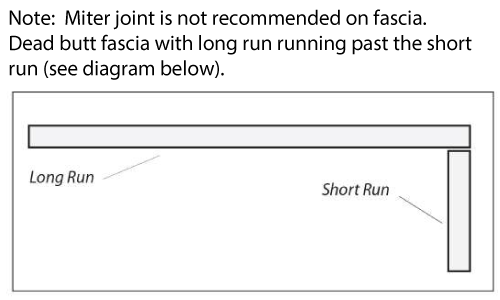
- Measure and cut fascia to length, allow for a 1/8” gap between fascia planks and butt joints. (See Figure 4)
- Install fascia with matching colour screws (minimum length 1-1/2”). If using new, wet lumber, pre-drill a hole that is slightly larger than the screw shaft to allow for contraction as the substructure dries.
- PL Premium Max (by LePage) construction adhesive is required when securing fascia to solid wood rim joists. The wood rim joists will expand and contract at different rates than the Clubhouse material, and without adhesive, extreme temperatures could break the screws or boards. If using an alternative adhesive, you must check with the adhesive manufacturer to make sure their product may be used with Clubhouse PVC Decking and Fascia.
- The manufacturer assumes no responsibility for the use of adhesives outside of the recommended PL Premium Max product.
- Screws should be installed at a maximum of 16” intervals, 3/4” from edge and end of plank.
- 12” width fascia use 3 fasteners evenly spaced
- 5.5” fascia or deck plank use 2 fasteners evenly spaced
- Never allow fascia to extend more than 1-1/4” below an unsupported joist. On 12” fascia installations, apply PL Premium Max directly to the rim of joist surface. See Figure 4 for screw pattern. Cortex plugs cannot be used for 12” fascia.

Hidden Fastener System Installation
Clubhouse PVC Hidden Fastener planks are designed to allow for easy installation – even by one person. No special tools are required to install the planks (see installation tools for a complete list). There are a number of hidden fasteners currently available today (including deck clips and biscuits) that have been used successfully to install Clubhouse Decking.
There are 3 Clubhouse branded, private label systems: Clubhouse ConnectClips and Clubhouse Cortex (private label partnership with FastenMaster), and Clubhouse EB-TY Biscuit (private label partnership with EB-TY). If using other systems, you should always consult the manufacturer of the fastener to see if their product has been fully tested for use with Clubhouse Decking.
The manufacturer is not responsible for any failure that is a direct result of the hidden fastener.
CLUBHOUSE FASTENING SYSTEMS
ConnectClip Hidden Fasteners
IMPORTANT: Read all instructions carefully and completely to ensure proper installation.
WARNING: Parts have sharp points and edges. Use extreme caution when handling and installing. Wear safety glasses and PPE at all times.
Tools and materials needed
- Safety glasses
- Rubber mallet
- Power screw gun with ratcheting torque setting
Step 1: Installing the First Board
Fasten one edge of the first board at each framing support using Cortex Fasteners for Clubhouse Decking or another brand of quality 2-1/2” (63.5mm) deck screw.
It is important that this board is straight and well secured. Allow a minimum gap of 1/4” (6.35mm) between the house and the first deck board. Follow fastener guidelines.
Step 2: Position Fasteners
Fully insert a Clubhouse ConnectClip fastener into the grooved edge of the deck board. Screw hole should line up with the centre of the support joist.
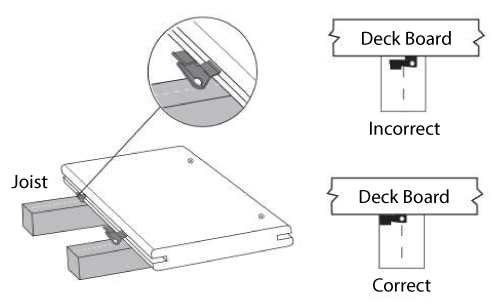
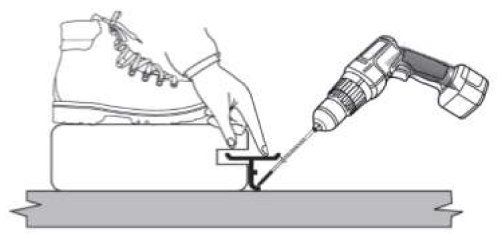
Step 3: Install First Fastener
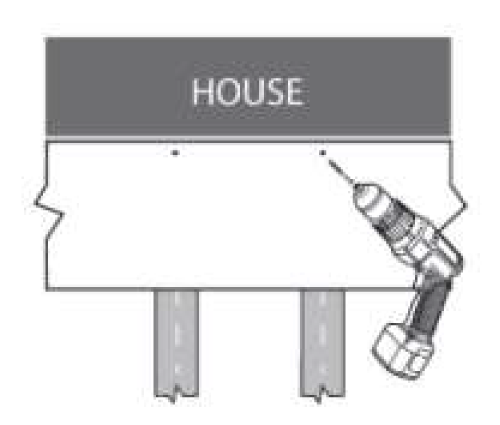
While standing on the deck board, install the provided screw at a 45° angle through the fastener and into joist, while applying pressure on the fastener. Install one fastener and screw at each support joist.
Make sure the fastener’s body is vertical to the deck board and the screw is holding the fastener down tight to the support joist. Adjust the torque setting on the screw gun to prevent spinning out the screw head.
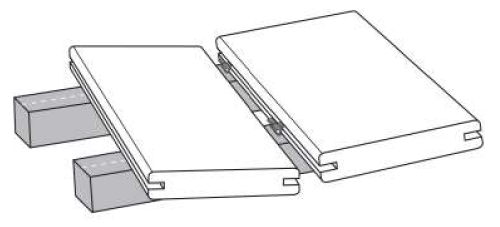
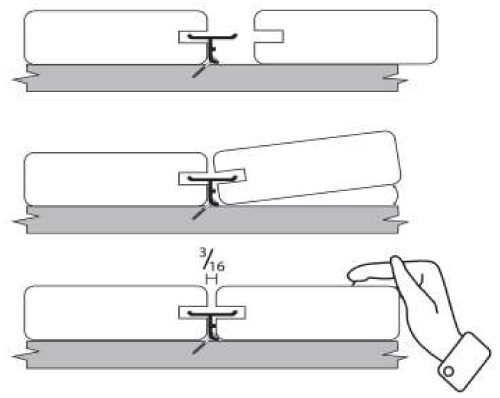
Step 4: Completing Installation of Boards
Place the next deck board into position against the fasteners. Slightly raise the outer edge of the board being installed, and slide it onto the fasteners until the board contacts the spacer tabs.
Check gaps between boards for consistency. Apply force to ensure board is fully installed.
Repeat Steps 2 through 4 until the deck is complete.
Check gaps between boards for consistency. Apply force to ensure board is fully installed.
Repeat Steps 2 through 4 until the deck is complete.
HELPFUL TIPS
Coverage
- Multiply the number of joists by the number of deck boards to equal the number of fasteners needed.
- 90 fasteners will cover approximately 50 sq.ft. (4.6 m²) using 5.5” (133mm) decking boards on 16” (410mm) centres.
How Do You Attach the Last Board?
To finish, we recommend using Cortex Fasteners for Clubhouse Decking or another brand of quality 2-1/2” (63.5mm) deck screws to secure the last board along its edge. Pre-drill and countersink all deck screws. Use PL Premium Max on rim joist to help secure the board with recommended screws. Pre-drill/screw should be a minimum of 3/4” (25mm) from edge of deck board.
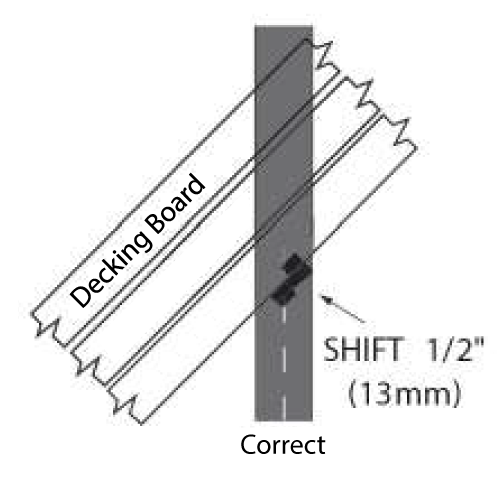
45° Angle Installation
When the deck is in the walled corner of the house, always start with a small piece of decking in the corner and work your way out. When installing ConnectClip fasteners, offset the centre 1/2” (13mm) toward the long point of joist, so the screw will not exit the side of joist when driven.
How to Do a Butt Seam
First, install a small framing board 10-12” (250 – 300 mm) alongside the joist on which the seam is going to land. Install an additional fastener into the previous board above the small framing block. Line up your first board in the centre of the joist and the small framing board. Install a fastener and screw at each joist of the first board including the joist at the seam. Then install your second board in the same fashion, and place a second fastener at the seam attaching it to the small framing block.
INSTALLING CONNECTCLIPS WITH TIGER CLAW PNEUMATIC INSTALLATION GUN
IMPORTANT: Read all instructions carefully and completely to ensure proper installation.
WARNING: Parts have sharp points and edges. Use extreme caution when handling and installing. Wear safety glasses at all times. Do not use Tiger Claw pneumatic installation gun and scrails for marine applications. The individual clips and screws must be used.
Tools and Materials Needed:
- Tiger Claw Pneumatic Installation Gun
- Safety Glasses
- Compressed Air Supply
- Collated Pneumatic Screws
- TC-G Clip (Horned Tab)
- Rubber Mallet
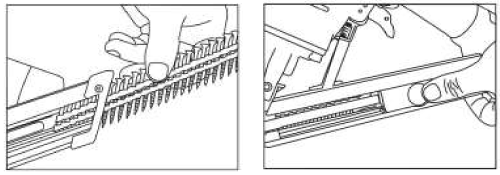
Step 1: Insert Pneumatic Screws
Insert a sleeve of collated pneumatic screws into the rear of the magazine.
Pull back the spring coil until it locks onto the back of the sleeve.
Step 2: Air/Pressure
Attach air hose. Be sure that the line pressure is 80-100 psi (pressure adjustment may be needed depending on framing material density).

Step 3: Mount Fastener in Gun
Place fastener into nose of gun with the “horned tabs” sticking outwards from the gun nose.
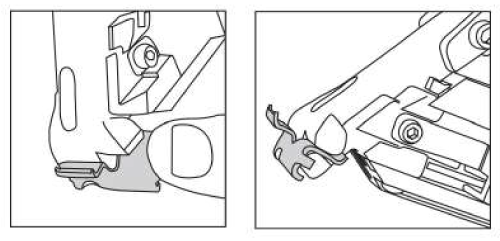
Step 4: Insert in Groove
Holding the gun upright, insert the horned tab into the groove of the deck board directly over the support joist.
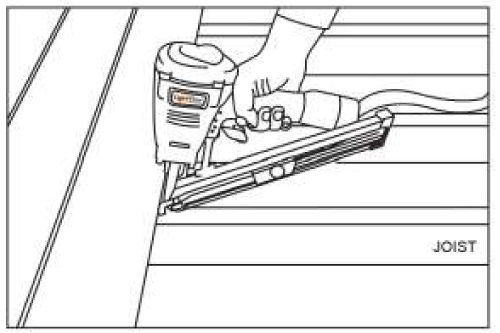
Step 5: Position/Angle
Once fastener is fully inserted, apple pressure to disengage the safety. Then, lower the back of the gun allowing the magazine to sit on the support joist to ensure a correct angle, and pull the trigger.
Step 6: Remove
With the magazine still resting on the joist, slide the nose of the gun to the right removing it from the attached fastener.
Repeat until the deck is complete.
HELPFUL TIPS
- Always keep fingers clear of the barrel.
- Never let the gun point at anybody while connected to an air supply.
- Do not pull the trigger while the safety is deactivated.
How to Replace a Board
- Make two parallel cuts down the centre of the board to be replaced, and remove the centre piece.
- Using a small pry bar, remove the remaining pieces of decking from the tabs.
- Using a reciprocating saw, remove the tabs on the side of the board with the screw heads showing.
- Position the new board into place, and carefully slide it onto the remaining tabs.
- Once the board is set into position, secure the lead edge with Cortex Fasteners for Clubhouse Decking or another brand of quality 2-1/2” (63.5mm) deck screws.
Cortex Fastening System
Use the Cortex Hidden Fastening System to hide deck screws on stairs, perimeter boards, and more.
Installation Procedure Suggested Drivers:
- Corded drill with 1/2” chuck
- Cordless drill with 1/2” chuck and 18V battery
- Impact driver
Using the Clubhouse setting tool, drive the fastener to the preset level below the deck surface. It must be driven perpendicular to the deck, with two screws per joist.
Place the plug into the cored hole and gently tap until it is flush with the deck surface.
Suggested Fastening Patterns
- 2 fasteners, 12” or 16” on centre for perimeter boards
- 2 fasteners at each stair stringer
- Minimum 3/4” from edge of deck board
IMPORTANT INFORMATION
- The Clubhouse setting tool must be used to set the Cortex screw at the correct depth.
- The Clubhouse fastener must be driven perpendicular to the deck surface for proper fit and ideal finished look.
- The cored hole must be free of debris or moisture.
- Use a smooth hammer head to set the Clubhouse plug.
- Use of non-Clubhouse screw or Cortex plug will nullify the warranty of the fastener. (See FastenMaster warranty).
- Fasteners supplied with Cortex plugs are not approved for coastal/marine/water applications. For these applications, stainless fasteners are recommended.
The diagrams and instructions shown here are for illustration purposes only and are not meant to replace a licensed professional. Any construction or use of the product must be in accordance with all local zoning and/or build codes. The consumer assumes all risks and liability associated with the construction or use of this product. The consumer or contractor should take all necessary steps to ensure the safety of everyone involved in the project, including, but not limited to, wearing the appropriate safety equipment. EXCEPT AS CONTAINED IN THE WRITTEN LIMITED WARRANTY, THE WARRANTOR DOES NOT PROVIDE ANY OTHER WARRANTY, EITHER EXPRESS OR IMPLIED, AND SHALL NOT BE LIABLE FOR ANY DAMAGES, INCLUDING CONSEQUENTIAL DAMAGES. 2021 TruNorth Composites All rights reserved. Clubhouse Decking is registered trademark of 2021 TruNorth Composite