
TruNorth Decking Slide & Go Clip System Installation Guide
TruNorth Decking is designed to work with a hidden fastener system to allow for expansion and contraction (see figure 1 below), therefore it is important to install the product according to the manufacturer’s recommended installation instructions. Failure to follow installation instructions will void product warranty.
Note: Enviroboard hollow profile is recommended for residential applications and, like many low maintenance deck boards, is recommended to be installed on 12″ O.C. spans for maximum customer satisfaction. 16” OC span installation meets international building code certification CCRR-1019 and is fully covered under warranty when installed in accordance with manufacturer’s specifications.

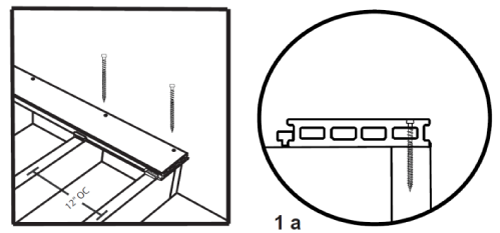
Installing First Board
Note: First board must be straight and secured.
Enviroboard Deck Board
Enviroboard is highly recommended to be installed on 12″ O.C. spans for maximum customer satisfaction. 16” O.C. span installation is covered under warranty as well, when installed in accordance with manufacturer’s specifications.
Position the first board along the edge of the ledger board and secure to each joist with a composite deck screw, at least 2 1⁄2” long. Ensure the head of the screw is flush with the top of the deck board. Do not break through the top wall of the board.
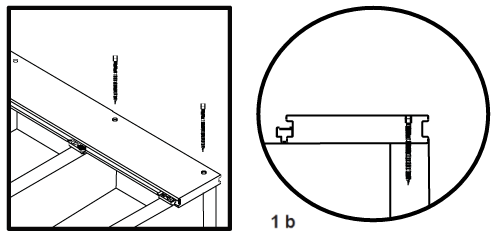
Accuspan Deck Board
Position the first board along the edge of the ledger board and secure to each joist with at least a 2 1/2″ composite deck screw, it is recommended to pre-drill the holes to prevent the composite board from cracking and the mushrooming of material at the screw head.
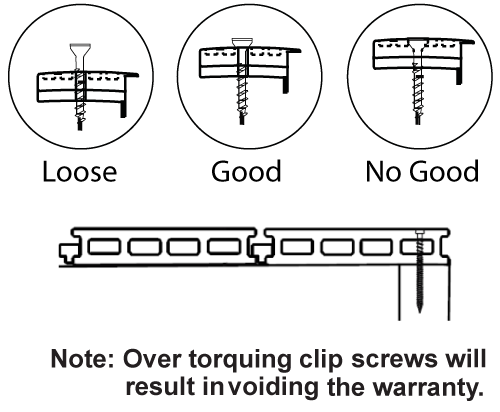
Driver Bit
Position a Hidden Fastener clip at each joist on the grooved edge of the board and secure it loosely with clip screw. Securing the clip loosely will allow the next board to slide under the clip smoothly. Continue positioning deck boards and securing to the joist with Slide and Go Fastener Clips. After a few boards are laid down go back and tighten the clip screws. Note: Do not over torque.
Clip Torquing Guidelines
Proper torquing of the fastening clips is important to ensure your deck boards will expand and contract. Overtorquing will drive the clip screw into the clip and restrict deck board movement. All drill torques are different so you should determine the proper setting for your drill. Also, wood will have different densities so you should take that into account when determining your torque setting.
Butt Joints (Figure 2) are not recommended. Instead, feature/breaker boards should be used perpendicular to the main decking direction whenever more length than one board is required. If installed with butt joint installation, warranty may not be covered.

End Spacing
Allow a minimum of 1/16” gap at board ends for every 6.6°C or 20°F of difference between installation temperature and the hottest temperature expected. Allow 1/4” distance between all material and any permanent structure or post. After all of the decking has been attached, snap chalk lines (white or yellow chalk recommended) flush with or up 1-1/2” out from the decking framing and trim with a circular saw.
TruNorth Decking, like all other wood and composite decking products, requires proper ventilation and drainage in order to ensure its longevity. When using a minimum 2×6 joist standing on edge and the suggested 1⁄4” side gap, there should be a 2” clear space between the bottom and the edge of the joist and grade to allow for proper ventilation. Adequate drainage is also needed to prevent water from pooling under the deck.
Finishing (Figure 3)
Trim any excess by ripping the length of the board and predrill the board and secure the board to the joist by surface screwing with 2 1⁄2” or longer composite deck screws. This will prevent the board from sliding out of the previous clip.

Colour Variation
Like most composite decking, TruNorth Decking will have colour variations from piece to piece. Do not install if variation is not acceptable.
TruNorth Decking is not suitable for structural use. It should not be used for primary load-bearing members such as posts, joists, beams, or stringers. The same common-sense precautions should be taken when handling TruNorth Decking as with wood or other building materials. Dust mask and eye protection devices are recommended to avoid possible irritation from sawdust and chips. Gloves will help to protect the hands. Hands should be washed after doing construction work.
The diagrams and instructions shown here are for illustration purposes only and are not meant to replace a licensed professional. Any construction or use of the product must be in accordance with all local zoning and/or build codes. The consumer assumes all risks and liability associated with the construction or use of this product. The consumer or contractor should take all necessary steps to ensure the safety of everyone involved in the project, including, but not limited to, wearing the appropriate safety equipment. EXCEPT AS CONTAINED IN THE WRITTEN LIMITED WARRANTY, THE WARRANTOR DOES NOT PROVIDE ANY OTHER WARRANTY, EITHER EXPRESS OR IMPLIED, AND SHALL NOT BE LIABLE FOR ANY DAMAGES, INCLUDING CONSEQUENTIAL DAMAGES. 2021 TruNorth Composites All rights reserved. TruNorth Decking is registered trademark of 2021 TruNorth Composites Ltd.